In this post, you will learn how to create a customized VSCode extension using React.
Creating a VSCode extension is a fun exercise. The entry barrier for submitting it to the marketplace is surprisingly low, and the process of submission is smooth. Plus it’s a great way to give back to the developer community.
As a side note: recently I created a VSCode extension using React called Sheepy . It’s an interactive guide for learning Functional Programming using Ramda.JS. If you’re like me, struggling to use functional programming consistently in your code, you’ll find it useful.
VSCode allows you to build different types of extensions, from themes to code snippets to code completion. But when using React, you’re choice is narrowed down to WebView extensions.
WebView API allows building custom user interfaces beyond what the native VSCode API provides. Using WebView, you can load custom HTML and JavaSript right into the VSCode.
Let’s start with setting up our project.
Setting up the VSCode project
Luckily for us, there’s a template we can use to bootstrap our project. The first thing you need to do is clone this repo. The repository is based on create-react-app and uses TypeScript, which is a big boon for us.
Dependencies
The repository maintainers haven’t touched it for a couple of years, so I suggest updating the dependency versions. In my case, I had to update react, react-dom, and vscode dependencies to make the project work with the other libraries I used.
Start command
You will need to set up a VSCode command for triggering your extension. By default, the project’s start command is react-webview.start. You might want to substitute that to {YourAppName}.start. Here’s what the command looks like when the user triggers it:

Two properties in package.json should match your command:
activationEvents– that’s where VSCode registers events that will trigger your extension.commands– a list of commands that your extension provides.
On top of that, you need to make sure to match the name of your commands in ext-src/extension.ts. That’s the entry file for your extension. Here’s is what it looks like:
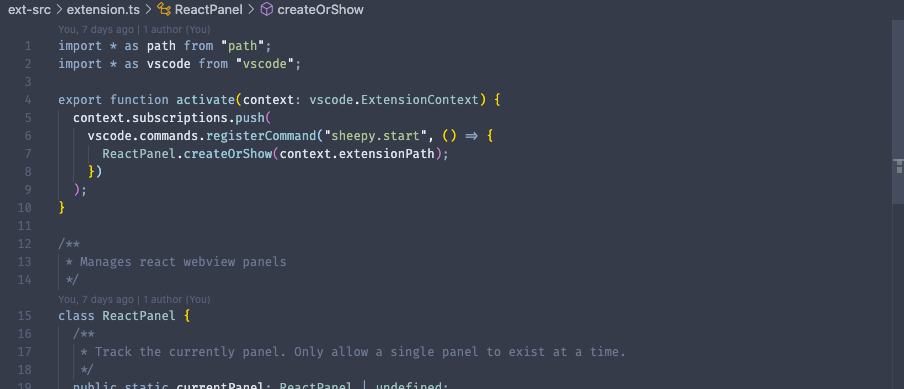
Take a look at the activate function and make sure the value of the first parameter in the registerCommand method matches the command you set up in package.json.
Package.json metadata
Should you choose to publish your extension, VSCode will use metadata from the package.json to populate your listing. That’s why it’s worth going over it and making sure that the important fields such as description and name are polished and match your brand. Here’s a link to the official guideline from VSCode docs.
Now let’s go over some common needs and gotchas when developing an extension.
Common scenarios when building an extension
Loading assets
To accommodate for the restrictions VSCode API has for loading local assets, the project requires you to use the relative path. That means you can load images, CSS files, and other assets as long as you use the relative path to access them. More on the restrictions here.
Preserving the state
Webview in VSCode has its lifecycle. When the user switches away from your extension’s tab, the current state of your Webview is destroyed. That means that any user input will be wiped out.
Luckily, VSCode API provides a way for you to store data in a storage equivalent to the local storage in web applications. The method you need to use to interact with that storage is acquireVsCodeApi. Here’s a sample of utility methods for storing and retrieving data from the storage:
|
|
You can use these methods to save data when the user switches tabs. However, if the user closes your extension’s tab completely, this data will be destroyed anyway, along with your Webview.
Note that you can only call acquireVsCodeApi once in the lifetime of your application. So I suggest storing it in a variable that you can access later.
Debugging with developer tools
Pretty soon, you will want to inspect your elements and debug your code. VSCode provides a built-in tool for debugging your application locally – Developer Webview Tools.
You can trigger it using VSCode’s command input. Make sure your extension is running locally and type Developer: Open Developer Webview Tools:

Under the hood, Developer Webview tools are regular browser dev tools since VSCode loads the Webview extensions using an iframe.
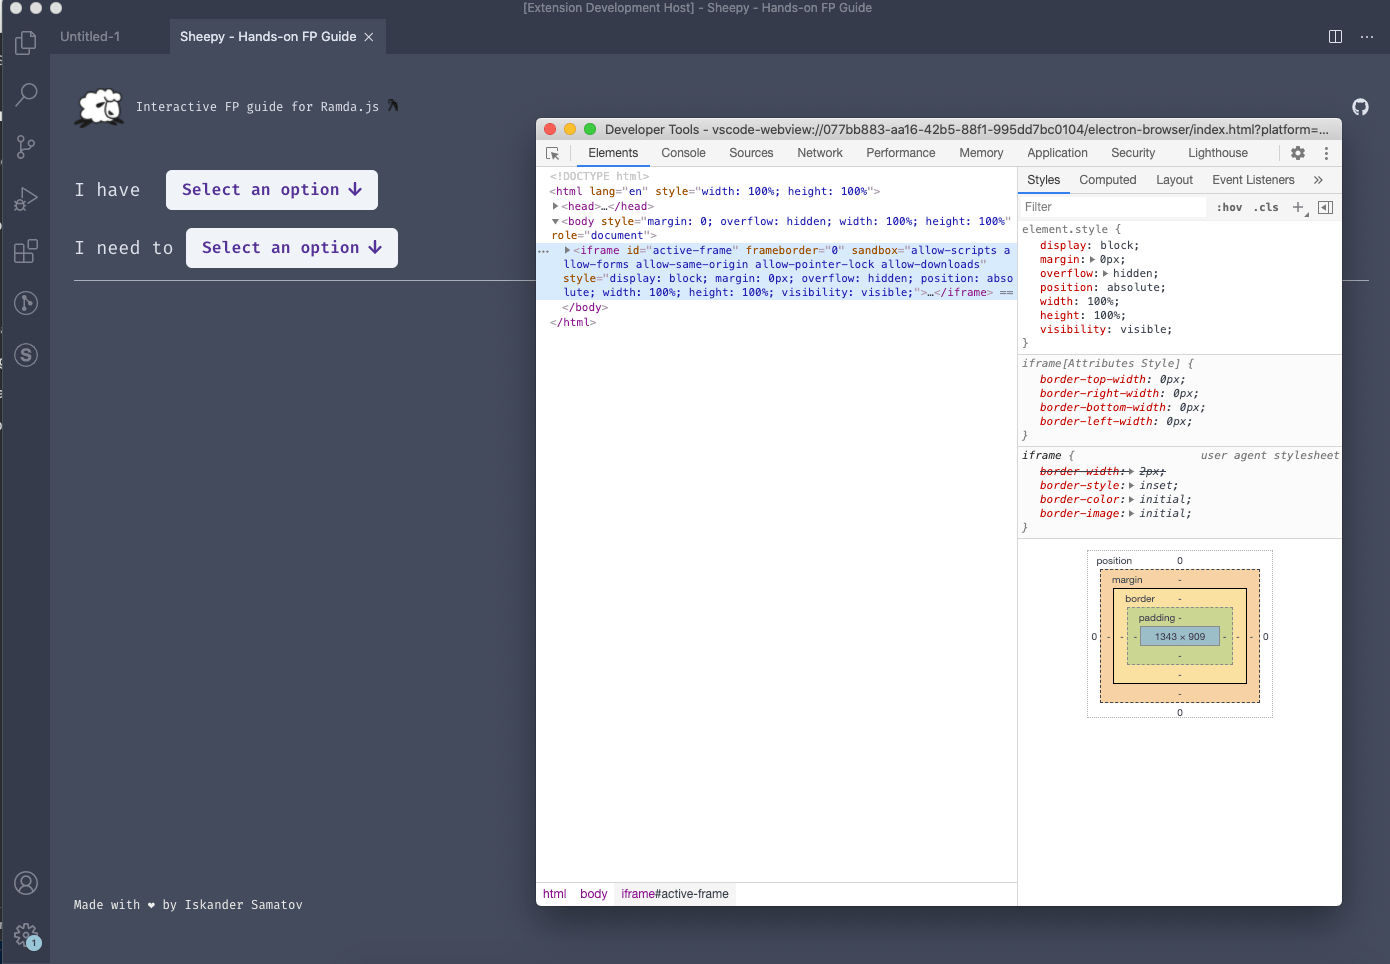
As a result, you can do all the things you can do with the browser dev tools, like inspect and view the console.
CSP Rules
According to MDN Web docs: “Content Security Policy (CSP) is an added layer of security that helps to detect and mitigate certain types of attacks.”
In VSCode, CSP rules govern the access to the local files and other external assets. In our template project, CSP rules are set up in extension.ts file using the meta tag. If you’re having trouble loading external resources into your application, CSP rules should be the first place to inspect. If you want to learn more about CSP rules in VSCode, check out this link.
Limitations when building an extension
The biggest issue with writing a VSCode extension, in my case, was the build process. Each time you make a change, you will need to rebuild your local bundle using the yarn run build script. Then you’ll need to restart the extension using the F5 key.
Unfortunately, there’s not much you can do about the need to restart the application each time. But at least you can start a nodemon process that will run the build script for you. Add the following line to your package.json:
|
|
Now all you need to do is run watch-build once in the beginning.
Conclusion
Building a VSCode extension is fun. You can tell that the VSCode team put time and effort into making their developer API easy to use. And they provide useful beginner guides that introduce you to all the different kinds of extensions you can build.
Their Webview API makes it possible to build a completely customized UI for your extension. Again, if you would like to see a completed VSCode extension built with React, you can check out my repo here.
If you’d like to get more web development, React and TypeScript tips consider
following me on Twitter,
where I share things as I learn them.
Happy coding!