One of the most challenging parts of developing Gmail add-on is properly setting up an authentication system, especially if you’re connecting your server(3rd party system). The challenge is mostly due to the fact that Google’s documentation on this topic is quite scarce.
In this tutorial I will go over the basics of implementing the authentication system for Gmail add-on.
Workflow
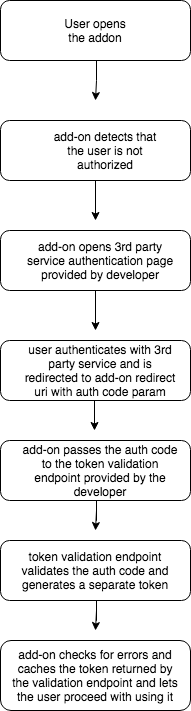
Before we get to the code here’s a diagram of the overall flow. Don’t worry if it seems confusing. It will all make more sense when we get to the implementation.
The first step is self-explanatory, so we’re going to go over the rest of the steps. However, before we do that we need to setup our Google AppScript project for the add-on.
Before we start:
Setting up Google auth system in production requires hosting your pages on secure endpoints which is why I’m using ngrok . Ngrok is a tool that allows you to expose your local server through the public urls.
Also, the full code for this tutorial is available here.
Setup add-on project
I’m not going to go over the process of setting up the add-on project since it’s explained well enough in Google’s quick-start post. However, one advice I want to give is not to use Google AppScript console for writing and deploying the code. Instead, develop in your local environment using the IDE of your choice(I prefer VScode) and deploy the add-on using clasp .
There is one step we need to take before we get to coding – we need to setup our Google OAuth client. If you followed the quick-start tutorial, you’ve probably created an API project for your add-on. So now you need complete the following steps:
- Login the Google API console
- Open
Credentials - Create New Credentials -> OAuth Client -> Web Application
- Click on your newly created client and under
Authorized Redirect URIsadd the following: - Make sure to substitute
AppScriptIDwith your actual project id, you can find it on AppScript home page . If you open your project and look at the URL, your ID will be that alphanumeric string before/edit
This redirect URL is provided by the add-on and hosts a script which will be used during the authentication process.
Here’s my simple demo page without any authentication logic in it yet:
|
|
Add-on authentication code:
Another thing we need to do is import the library that Google provides for us here . If you’re using clasp I suggest downloading the library source code and adding it to your add-on project.
Here’s the authentication logic code for the add-on:
|
|
getService— creates and configures an instance of the authentication process. In this method we set the url for our 3rd party login page and our token validation endpoint(we’ll talk about it later). Also, we setup our client id and secret which we created earliercheckAuth— checks if the user is logged in, if not, throws an exception provided by the add-on auth library and callscreate3PAuthorizationUimethod to display login pagecreate3PAuthorizationUi— builds and displays a simple login page with the button that triggers the authentication processauthCallback— triggered when the user authenticates with our the 3rd party services
Here’s an updated buildAddon method:
|
|
Setup 3rd party authentication page:
Next, we need to setup an authentication page for our server, or 3rd party services. In this example we will also use Google SSO for our server auth, but you can set it up using whichever method best suits your needs, the important part is following the overall flow.
If you’re going with Google SSO, make sure to create a separate OAuth client for your 3rd party services. You can follow
this tutorial
. Here’s my simple login page that also uses ejs template engine for Node.JS:
|
|
Important notes:
- Once the user successfully authenticates, the
onSignInfunction is called onSignInextracts theidTokenand redirects the user to theredirectUrireceived from the add-on, passing theidTokenas acodeparameter.redirectUriand other parameters in between<%= %>came from the get request that the add-on made when starting the auth process
Setup Token Validation endpoint:
It’s time to setup the Token validation endpoint.
Once the user is redirected from our 3rd party auth page to the redirect uri, the script at the redirect uri will send a post request to the token validation endpoint to validate the code parameter the script received from our 3rd party auth page.
Since the code parameter that the token uri receives is the idToken we passed earlier, we need to validate that idToken using google services and return a JSON object that will indicate to the add-on whether the authentication process was successful or not:
|
|
Above is my basic implementation of the token validation endpoint written in Node.JS. All it does is check whether the code param was passed. Make sure to actually validate the code! You can use
this endpoint
to validate the id token we passed as a value for the code.
The endpoint needs to return a JSON object. If the validation was successful the object should contain expires_in property which sets an expiration time for the add-on session in seconds. If there was some kind of error while validating the add-on, it needs pass the error to the error property.
Final Steps:
Once our token validation url returns, the add-on will trigger authCallback method we defined earlier. The method will validate our token endpoint response, cache the session and refresh the add-on page, allowing the user to proceed with using it.
And that’s the end of this brief overview. I hope it was helpful and let me know in the comments if you have any questions!
If you’d like to get more web development, React and TypeScript tips consider
following me on Twitter,
where I share things as I learn them.
Happy coding!