
Design patterns is a knowledge passed down to us by developers much smarter than us which we can use to solve certain software design problems. They help us keep our projects maintainable and our code elegant.
In this two-part series I’m going over six essential patterns that can help you keep your code maintainable when developing with JavaScript. The design patterns were largely popularized by the GoF (Gang of Four). The variations of those patterns described here were adapted to the versatile nature of JavaScript.
This is the first part of the two-part series where we’ll go over the Factory, Proxy and Strategy patterns.
Factory
This is the first and arguably the easiest pattern to get a grasp on. Factory pattern is widely used in a world of development and comes down to two simple concepts:
- Abstract the object initialization by wrapping it in a function called “factory”.
- Have the client use the factory instead of directly initializing the object.
Let’s take a look at an example:
Imagine we have this Pet class:
|
|
Now we can a create new Pet instance like this:
|
|
So far so good! But what if we decided we want to restrict the allowed species to only cats and dogs? That means we would have to modify each instance of Pet object initialization and add a check for the valid species. If we have a lot of instances initialized throughout our project, this could become unmanageable.
Could this have been avoided? Yes! We could define a factory function and use it instead to initialize our Pet instances:
|
|
Notice that instead of exporting the Pet class itself, we exported the factory function createPet . This function creates and returns a new instance of the class.
|
|
Now we’re using createPet everywhere in our project to define new Pet objects. Thus, if we decide to limit the allowed species, all we have to do is modify our createPet function:
|
|
From client’s perspective nothing changed, it still uses createPet function to initialize new instances. It’s obvious that the factory pattern makes our object initialization process much more flexible.
Proxy
The purpose of this pattern is to enhance the functionality of an object without modifying the object itself. The wrapper that enhances the functionality is called a “proxy”, while the target object is called a “subject”. Proxy mirrors the internal structure of the subject so that the two can be used interchangeably.
This pattern provides a lot of benefits, here are some of them:
- Access control — proxy can verify that the client has an access to the subject
- Argument validation — proxy can validate function arguments before passing them to the subject
- Caching — proxy can cache the result of some heavy computing performed by the subject to avoid unnecessary recomputing.
Let’s look at a simple proxy implementation:
|
|
As you can see, implementing a proxy can be quite easy. The enhanced method is where we added our proxy’s custom logic that enhances the subject’s functionality. While, the delegated method is where we used the subject’s method without any modification.
You can avoid manually writing the delegated methods using either of these two options:
- You can use NPM packages such as delegates`.
- New ES6 specification includes a class
Proxythat can be used to create a new proxy:new Proxy(target, handler). Heretargetis our subject whilehandleris a special object that specifies the behavior of the proxy.
The above implementation of the proxy was simple but it does not guarantee complete interchangeability between the proxy and the subject. To fix that, we can create our proxy using the subject’s prototype:
|
|
In the code above we created a copy of the subject’s prototype using Object.create(). Next, we assigned it to our Proxy function which is used to create new proxies. If you run this code, you should see console.log print true:
|
|
Using this implementation, we increased the interchangeability between our proxy and its subject.
Strategy
This pattern can come very handy when you have a certain algorithm that repeats itself throughout your application with a slight variation in its logic. The algorithm in this case is called “context” while the variable part is called “strategy”.
The logic of the context doesn’t change except for it using different strategies in different parts of your application. A good example of it would be a notification system with multiple different channels available. Depending on user’s preference, you can send notification using different channels while leaving the system’s core logic in tact.
Here’s a diagram to illustrate this concept:
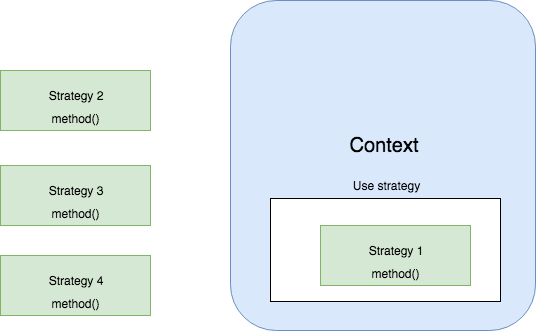
As you can see, all of the strategies have the same interface which makes it possible for our context to switch between them seamlessly. Hopefully, you can quickly imagine all of the different scenarios where this pattern could prove to be useful.
If you’re interested, you can read more about the strategy pattern in my other blog post .
And that’s it for this post! In the second part, we’ll discuss the other three patterns: Adapter, Observer, and Revealing Constructor.
If you’d like to get more web development, React and TypeScript tips consider
following me on Twitter,
where I share things as I learn them.
Happy coding!