Have you ever been reported a regression bug that you suspect was introduced many commits ago?
If you think it’s going to be a long and painful exercise finding the culprit, don’t roll your eyes just yet. You can use git bisect to find the offending commit much faster.
In this tutorial, we will go over the basics of git bisect with a hands-on exercise.
What is git bisect?
In a nutshell, git bisect is a command-line tool for analyzing the commit history and finding bad commits. Git bisect uses the binary search algorithm under the hood. Binary search makes finding bad commits pretty fast, even in a long commit history.
Now, let’s get to it! I recommend following along to get a better understanding of the topic. And to make sure I’m not making things up. You can clone this repo to follow along.
Using git bisect
git bisect uses the good/bad commit approach. As git iterates through the commits, you need to tell git whether the current commit is good or bad. Doing so will help git bisect quickly narrow down to the target commit.
Once you start git bisect, the steps are simple:
- Test the current commit and check if the bug you’re tracking down is present.
- Based on the first step, mark the current commit as good or bad.
Now let’s see this in practice. If you run the app locally, you can clearly see the error:

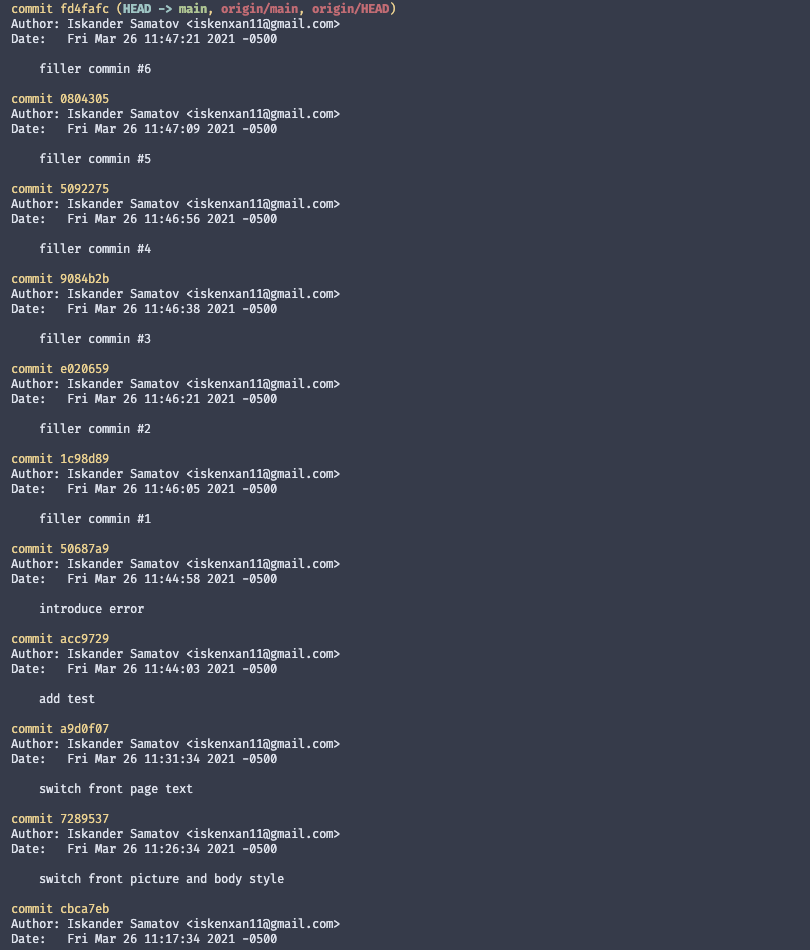
First, let’s run the git log command to see the commit history:

The commit that introduced the error, is introduce error. But let’s pretend we don’t know that. For the first good commit, we will pick switch front picture and body style. As far as we know, that’s the latest commit that doesn’t have the error. For the first bad commit, let’s pick the latest one, filler commin #6 (please ignore the typo).
Now let’s run the git bisect command and provide the initial bad and good commits:

Thanks to the binary search, looks like we’ve only got two more iterations to test. Your current active commit now is 1c98d89, which is filler commin #1. Now you need to test the app manually and see if the bug is still there. In our case, 1c98d89 still contains the error, so we mark this commit as bad using git bisect bad. Here’s the console output:

git bisect moved on to the next iteration. Now we test again, and it looks like this commit doesn’t have the error we’re tracking.

So we mark it as good using git bisect good:

From the console output, you can see that there are no more revisions to test. It means we found the offending commit, which in our case is introduce error. Good job!
Once you’ve finished your testing, you can reset bisect using git bisect reset.
Automating the search
Manually running git bisect is often a fine solution. But if you have a test script that you can run to validate commits, you can use it to automate the whole thing.
Here’s how I used the test script from the sample repo to let git bisect find the target commit for me:

git bisect will start the search and will run the test script on each iteration. Here’s the final result:

I no longer had to test commits manually each time. The command tool and the test script did the work for me!
git bisect is a handy little tool for quickly finding gnarly commits. It also works particularly well with good test scripts, which is another point in favor of having a robust test suite in your project.
If you’d like to get more web development, React and TypeScript tips consider
following me on Twitter,
where I share things as I learn them.
Happy coding!