Smooth animations immediately make any website stand out and make it more inviting. That is why fluid animations and interactions can be one of your primary tools for improving the UX of any application.
Developers often put lots of effort into reducing the initial page load time, tuning it to shave off a few extra milliseconds. Yet they forget to invest in their website’s interactions which can be just as beneficial.
In this post, we’ll work on building an understanding of what it takes to create animations that are smooth and performant. We will also cover what tools you should use to tune and analyze animations in your React application.
While this post is written with React in mind, the lessons can apply to any JavaScript app.
FPS and Why it Matters for React Applications
The most important metric to keep in mind when testing web animations is FPS.
FPS, or frames per second, is a measure of the speed at which an output device displays consecutive images. It’s a measurement of how smooth any given interaction feels.
For animations, this number needs to be high enough to create the illusion of motion by displaying a series of still images at a fast-enough pace. If the FPS is too low, the animation will seem choppy to the human eye.
60 FPS is the refresh rate that most displays have. 60FPS is the ideal target for smooth scrolling and will enable a more compelling user experience.
If you break it down, with 1000 milliseconds / 60 frames per second, each frame only has 16.6 milliseconds to render - not a lot of time. That is why achieving 60 FPS is not always easy!
If you can’t reach 60 FPS, aim for 30 FPS instead. 30 FPS will still make interactions smooth as long they stay consistent. Consistent 30 FPS beats inconsistent 60 FPS. With that said, at 15 FPS or below, any animation becomes noticeably jerky.
All in all, FPS can play a significant role in the user engagement level of your application.
Optimizing your Animation Performance
Pixel pipeline
When working with animations or transitions, it’s good to understand the pixel pipeline.
Pixel pipeline describes the five steps a browser takes during each rendered frame, which are:
- Running JavaScript
- Changing CSS reflow properties
- Recalculating element geometry based on the reflow properties
- Rendering elements in layers (painting)
- Ordering layers correctly on the screen (composing)
![]()
Understanding the order of the pixel pipeline operations and which changes to the DOM trigger which operations are crucial. It’s also worth noting that some operations are less expensive than others. For example, composing is much faster to perform than painting.
Now let’s get to animations: there are two ways you can animate elements: CSS (declarative) or JavaScript (imperative). As with many things, which method to pick will depend on what works best in your situation.
CSS animations
Generally speaking, CSS animations are more performant than JavaScript animations.
Not all CSS properties are made equal
As I mentioned earlier, composing is cheaper than pixel painting. That is why, when possible, you should use properties that trigger composing over the ones that trigger repainting. Properties such as opacity or transform are good examples of the former ones.
For similar reasons, when trying to hide elements, it’s more performant to use opacity over display or visibility. As a side note: when using opacity, you should also set pointer-events to none. Doing so ensures that a user doesn’t accidentally click on the hidden elements.
|
|
Promote element paint
But you can control more than just which CSS properties to use. You can also manually promote an element to its own compositor layer (remember our overview of composition in the pixel pipeline.) This forces elements to always be painted and ready:
|
|
This is the easy way to let the browser know which elements are paint- expensive and thus need more focused assistance. But try not to overdo it because the will-change optimizations can get heavy. And the browser already does its best to tune performance.
JavaScript animations
While JavaScript animations provide better control, they lack performance. They run on the main thread, which makes them more likely to drop frames or run them inconsistently.
Combine JavaScript with CSS
One way to combine both the control of JavaScript and the performance of CSS is by declaring your animations in CSS and triggering them by switching classes in JavaScript. Or, if you are working with newer browsers, the Web Animations API also allows you easily combine CSS and JavaScript animation code.
Use libraries
Use popular animation libraries instead of writing your own custom solution when possible. Those libraries are usually battle-tested and will do a better job optimizing performance than you could on your own. Some good examples of animation libraries for React are framer-motion and react-spring .
Use requestAnimationFrame
If you do end up writing your own code, use
requestAnimationFrame
to tune your animations. requestAnimationFrame is more performant than simply using setTimeout or setInterval. It tries to minimize the frame loss by grouping changes into a single repaint, which saves CPU cycles.
Use Intersection Observer
If your animation depends on elements entering or exiting the viewport, you can use the Intersection Observer API to track that. Doing so is a much better alternative to polluting your application’s execution thread with event handlers that manually calculate the position of affected elements using methods like Element.getBoundingClientRect() .
Avoid redundant reads
The order in which you perform read and write operations to the DOM can also affect the performance. By doing back-and-forth reading and writing you will cause redundant reflows that hinder the performance.
To avoid this, try to minimize the duplicate reads by storing the values:
|
|
Throttle and debounce
Some DOM events, like scrolling, can fire quite often. So you might want to consider debouncing or throttling your callbacks to avoid triggering expensive operations too often.
Say we have an event that runs an animation as the user scrolls through the list. Instead of running the animation every time the user scrolls, you can throttle it at a reasonable interval that will still keep your animation running smoothly:
|
|
Now the callback will only trigger once every 100 milliseconds because we are throttling it rather than calling it each time the event occurs.
Analyzing animation performance in React
Chrome developer tools
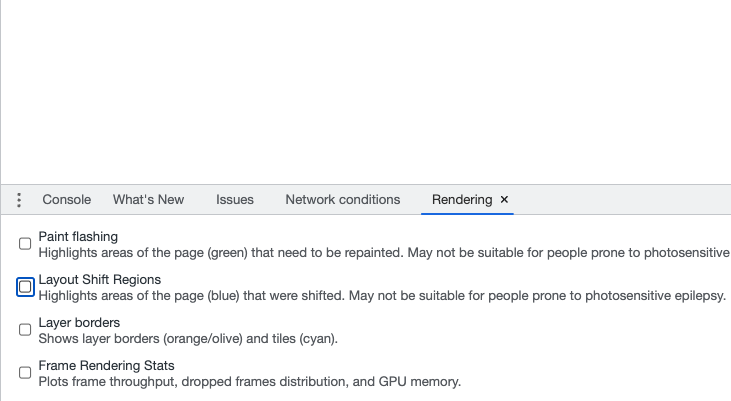
While knowing tricks for improving your application is necessary, it’s just as necessary to be able to troubleshoot performance issues. And one of the best tools for measuring web performance is Chrome developer tools.
Under the More Tools menu in the console, you will find the Rendering tool with several options, including tracking dirty elements, paint flashing, calculating FPS, highlighting layer borders, and others.
Profiler
Now let’s talk about React-specific tools. The redundant rendering of the components can often affect animations and make certain interactions feel janky. React profiler can be used to analyze rendering and performance issues in React applications. React profiler is a part of the React Dev tools chrome extension. Official React docs have a nicely-written, comprehensive overview of React profiler.
Conclusion
And that’s all for this post. Animation is a powerful tool to improve user experience and drive engagement, but creating smooth and seamless interactions takes work. And when you see a website that feels smooth, you know the makers have put in the time to create an excellent experience for their visitors.
Hopefully, this post has given you some useful tips and tricks on how to do so in your apps.
If you’d like to get more web development, React and TypeScript tips consider
following me on Twitter,
where I share things as I learn them.
Happy coding!